Thursday, January 31, 2013

Candy Bar Cake


WARNING: THIS CAKE IS DELICIOUS AND INSANELY SWEET!


If you have a history of high blood pressure or if diabetes runs in the family, please advise your family physician before attempting to BAKE or EAT this cake.

The chocolate buttercream in this cake is great but like most buttercreams it's just a little too sweet in my opinion. Next time I make this cake, I 'm going to take the suggestion of a friend and use softened chocolate ice cream instead! Sounds yum, right?!? But oh man, don't even get me started on that dulce de leche layer!! It is TO DIE FOR and I can see myself just scarfing down a whole bowl of that stuff!! YUM AND YUM!!

For the cake:

1 (10.75 ounce) frozen pound cake
5 ounces of semi sweet chocolate chips
2 sticks of unsalted butter, at room temperature
4 Tbsp of milk
1 tsp of lemon powder extract
1 pound of powdered sugar
1 cup of salted roasted peanuts
2 (13.4 ounce) cans of dulce de leche

For the chocolate coating:

12 ounces of semisweet chocolate chips
1 stick of cold unsalted butter, cubed

*To make the "squiggle" on top of the cake you will need:

1 cup of semi sweet chocolate chips
3 Tbsp of unsalted butter, room temp

Optional: cake board

Assemble the cake:
Trim 1/4 inch off of the short ends of the pound cake, then trim the domed top to make it flat. Slice the cake in half horizontally to make two equal sized triangles.

Microwave the chocolate in 30 second intervals, stirring until melted. Beat your butter until smooth and then slowly add in your powdered sugar, lemon juice powder, and milk. Beat until smooth, scraping the bowl at least once. Beat in your melted chocolate. Add more milk if needed, to make the frosting spreadable.

Lay the cake on your cake board(if using), and place it on a wire rack set on a rimmed baking sheet. Spread some of the frosting on one short end of each cake and press together firmly to form a long rectangle.

Spread the remaining layer of your chocolate buttercream onto your cake, making it at least 1 inch thick. Smooth the tops and sides with an offset spatula. Freeze until firm, about 30 minutes to an hour.

Mix the peanuts and dulce de leche in a bowl.

Remove the cake from the freezer. Spread an even layer of the peanut mixture over the chocolate buttercream and freeze again for another 30 minutes to an hour.

Meanwhile, make the chocolate coating by microwaving the chocolate and butter in 30 second intervals, stirring until smooth. Remove the cake from the freezer and spread the chocolate over and around the cake. Use an offset spatula to smooth the top and sides of the cake. Dip the spatula in hot water, and wipe off excess, and smooth out chocolate until smooth. Freeze for 5 minutes or just until firm.

Melt 1 cup of semi sweet chocolate chips with 3 tablespoons of butter in microwave. Stir until smooth. Remove cake from freezer and pour chocolate mixture in a thin line on top of the cake. Smooth out slightly. Starting at the short end of the cake, dip the edge of an offset spatula into the chocolate at an angle and gently pull up, repeating along the top of the cake to create a wave pattern. Chill for 15 minutes in fridge before serving!

Recipe adapted from Food Network Magazine.

Wednesday, January 9, 2013

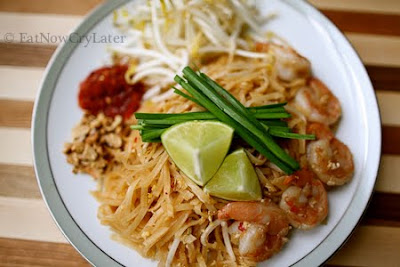
Pad Thai


Ingredients:
1 package of dry rice noodles(preferably size M)divided
1 pound of shrimp, cleaned and deveined(also marinated with 2 Tbsp of the FINISHED pad thai sauce)divided
6 cloves of chopped garlic, divided
2 Tbsp of ground chili paste mixed with 1/2 tsp of paprika(if you like it spicier, add more chili powder, or you can omit all the spicy flavors and sub with more paprika for color), divided
4 eggs, divided
bean sprouts
peanut oil
sesame oil
some warm water

For the pad thai sauce:
3/4 cup of palm sugar(or sugar)*
1/4 cup of tamarind concentrate plus 1 cup of warm water
1/2 tsp of salt
1 cup of warm water
1/2 cup of fish sauce
*Browse my blog on a quick post on how to melt palm sugar!

Garnishes:
dry roasted, ground peanuts
chives
chili powder or ground chili paste
fresh bean sprouts
lime wedges

*BE SURE TO HAVE ALL OF YOUR INGREDIENTS READY BEFORE STIR FRYING!

Soak your dry rice noodles in some warm water for about 30 minutes or until al dente. You want them to be slightly softened and pliable but not too soft. Just check on them often to make sure you don't overdo it. Drain them completely and drizzle in some sesame oil. Toss to coat. Set aside.

Combine all of your ingredients for your pad thai sauce in a pot and cook on an outside burner. If you can't simmer this outside, then you might want to rethink making this dish! The aroma from the fish sauce simmering away, is bad enough to make you want to climb into your car, drive half way across town, and slap yo mama. No lie. You want to keep the ingredients at a medium boil, with the lid slightly cracked to relieve some steam. Boil for about thirty minutes, or until you see most of the liquid start to bubble away and has become slightly thickened. Make sure you stir often to prevent burning. Once done, set aside to cool down. The sauce will thicken upon standing. Set aside.

Take some pad thai sauce and mix it in with your shrimp. Next, with a wok on medium high heat, add in 2 cloves of chopped garlic and stir fry for a few seconds. Add in your shrimp and cook until almost cooked through. Remove and set aside.

Using the same wok, add in two handfuls of the dried noodles. Add in a little bit of warm water plus a ladle of pad thai sauce. Cook until noodles are done to your liking(making sure to stir constantly to prevent sticking). Add half of the shrimp back in and make a well in the center of the wok. Crack two eggs into the middle and wait a minute before mixing. Stir to combine the eggs with the noodles and shrimp. Once done, turn off heat and mix in some bean sprouts. Remove immediately, and place on a serving platter. Garnish with chives, dry roasted peanuts, chili powder or paste, fresh bean sprouts, and lime. Repeat process to make second batch.

Notes:
Do not double recipe for pad thai sauce. You must make the sauce in separate batches if you want more sauce. Once cooked, you may store in airtight container and keep for future use. If you would like more "tang" then you can add more tamarind concentrate. I like to add a generous squeeze of lime at the end, so too much tamarind for me would be overkill. The sauce on it's own might taste strong, but once you stir fry it with the noodles it will be perfect! Remember, it should taste slightly sweet, slightly tangy, and slightly salty! I say, "divided" in the recipe because you must cook everything in batches. In the video below, I show you how to make one batch of pad thai.

Designed with love by BDD